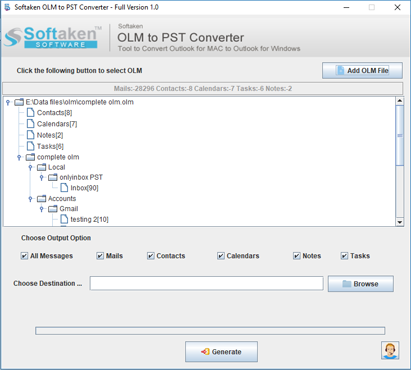
If a user is moving from Mac OS to Windows OS and doesn’t want to change his/her email client i.e. Outlook application. He/she needs a conversion of the Mac OLM file to PST format. In this tutorial, you will get a safe and effortless method to move the OLM database to Outlook PST.
Table of Contents
ToggleBefore we move towards the solution to migrate OLM 2 PST, let us discuss the terminologies in detail.
About Mac Outlook
Microsoft Outlook is one such email client that is available both for Windows and Mac users. For Mac users, it is known as Outlook for Mac and it stores the database in OLM file format.
About Windows Outlook
In Windows, Outlook stores data in PST format. All your emails, contacts, notes, journals, calendars, and other information are stored in a PST file extension.
Need for OLM to PST Conversion
Let’s find out the reasons for OLM file to PST Conversion
- If you were using Outlook for Mac previously but now planning to go for Windows platform. Windows Outlook does not support the OLM file of Mac as Windows Outlook supports PST files, in this case, OLM data to PST export is required.
- If you receive an OLM file from your friend but you are using Windows Outlook, you can’t access the OLM file. Therefore, Converting the OLM file to PST is needed.
How to export Mac Outlook to PST format?
To learn how to convert Mac OLM 2 Outlook PST, you can follow the given step-by-step procedure and simply become aware of the process.
Step 1. Download and install the application – Initially, you need to download and install the software on your Windows Machine.

Step 2. Adding OLM file – Click on the Add OLM file button and select the file that you want to export to PST format. There is no issue of file dimension. As you load the OLM file, you can get a clear preview of all the folders of the OLM file.
Step 3. Choice of Output options – It depends on what you want to convert. You can choose emails, contacts, calendars, notes, and tasks that you want to export from Mac Outlook to PST format.
Step 4. Choice of Output Directory – Next, you need to choose a destination path where you want to save the converted files. This location will be of your choice.
Step 5. Click the Generate button – Once you are done with the above steps, you can finally place your mouse pointer to the Generate button. This will start the migration process and take a few minutes to complete it.
Steps to import PST file in MS Outlook
- Open the Microsoft Outlook application
- Go to File menu > Open & Export > Import/Export option
- Select Import from another program or file, click Next
- Select Outlook data file (.pst), then click Next
- Browse the PST file, click Next
- Choose the account where you want to place the PST file
- Click Finish
